Vaping is considered as the best alternative solution of smoking as it does not contain as many carcinogenic materials as traditional cigarette contains in it. Vaping has become popular among the past few years, and many people used e-cigs to quit smoking. Users of e-cig inhale an aerosol created by nicotine which is far safer than smoking traditional cigarettes. Furthermore, vaping devices contain vape Kits, vape mods, and vape coils.
Vape coils:
Vape Coils are a spiral-shaped heating element made from long resistive wire, and resistance of a wire is measured in ohms. Vapers mostly prefer to build their own vape coils due to their financial budget and for more thick and robust vapor production. Building your own vape is a craft, and it needs practice to be perfect in it.
What you need before making your own coil?
Before you build vape coils, you must be equipped with all the major tools required for it. Below is a complete list of all the necessary tools for building vape coils:
- Resistance wire: Kanthal, nichrome, stainless steel.
- Ohmmeter
- Ceramic Tweezers
- Scissors
- Flush cutters
- Organic cotton
- Small screwdriver
- E- juice
Do Read: How To Clean A Vape Device? A Complete Guide
Oxidize the wire:
First of all, cut the 3-5 inches of Kanthal wire as it is easy to hold for beginners. Hold the wire with the help of tweezers or pliers. Oxidizing means to heat the wire slowly and then let it be cool. It improves the stability of the wire and makes it spring and easy to work with it.
Wrapping of the coil:
There are two methods of wrapping the coil. We will discuss here both of them.
- By screwdriver:
Hold your screwdriver and start wrapping the wire around it. Keep the tension strong that wrapping is firm, and there are no adjacent gaps in it. Firm wrapping is helpful for efficient conductivity and for avoiding overlapping in a wire. Continue wrapping until you have a correct number of loops for desired resistance.
- By Kuro Coiler:
You can also use the Kuro coiler for wrapping. By using the Kuro coiler, it will give more systemized and elegant wraps which are not possible if you do it by hand or manually. So, this option can be adapted for more precise wraps.
Installing in RDA
Now we will detach tank build deck of RDA and loosen the screws using a screwdriver. Do not loosen whole screws as it is difficult to put them back. Now take your screwdriver and insert one lead in the positive hole and the other in a negative hole. Make sure that the wire is straight and in the center of RDA. Now tighten the screws and remove the screwdriver and trim the leads close to the posts.
Ohm Reader:
Before using coil, it is essential to check the resistance of wire. Next, take your RDA to ohm meter to and make it ON to check there is no short circuit in it. If it shows any short circuit, recheck tanks properly. Take your RDA and screw to the ohmmeter and check resistance up to 1.2 ohms but it is common to have some slight change and variance in it to .2 ohm. However, if a difference is seen, check if the post screws are tight or not, and the coil must be touching the post. Meanwhile, checking these posts will adjust many problems related to it.
Testing Firing:
Now your coil is installed correctly, and there are no short circuits then put on your RDA to mod. Once the RDA is installed, fire your mod until it begins to glow brightly. When your coils began to glow stop heating your mod and with the help of tweezers squeeze your coils. Continue it until you have both glowing coils.
Wicking:
Once the coils are cooled off, it's time to add an absorbing wick. There are many things which are used for wicking like as:
- Organic cotton
- Japanese cotton pads
- Ekowool
- Silica
- Rayon fiber
Organic cotton is the most recommended one from all.
-
Make the rope-like shape of cotton:
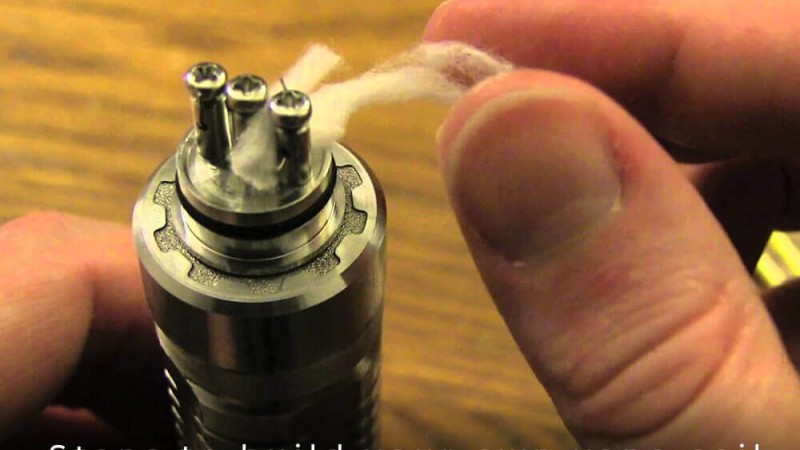
Make a ball of cotton and roll it until it becomes a rope-like shape and make sure it would be several inches in length that you can easily cut off.
-
Thread cotton in the coil: Pinch one end of the coil and thread it carefully in RDA. Make sure that the thickness of your coil should not be very thick that it causes resistance in coil. If there is thick cotton, it will not wick properly.
-
Cut the cotton ends: Cut the ends of cotton with the help of scissors. Make sure that cotton ends must not be touching and not sticking with e-juice.
Final Testing:
You are almost done with everything. Now before vaping, you have to check some preliminary checks. Firstly, check the resistance of the coil if required. Also, check screws and connections that you detached when you were building your coil. Once you are done with all checking, it's the time of your reward.
Conclusion:
Building vape coils is not an easy task. It requires skills and practice before you would be a pro builder. However, while learning about building coils one has to be patient and humble as perfection comes with time. In short, coil building is an important task in vaping. By reading this guide you will be able to build your own vape coil and can be a pro builder.


-400x300-400x300.png)


Leave a comment